Thursday, March 23, 2023

X++ job(runnable class) to loop through all tables in AOT - D365 F&O

 Hello DAXPeople,

Today we are going to see, how all the tables in AOT can be fetched using some standard framework.

The below code snippet will be having two AOT objects.

  1. Runnable class (GetAOTTablesList) : This class will have main business logic to loop through AOT tables                                                                                                                                               
  2. Table (AOTTablesList) : This table will be used to store the Table Label, Name, ID, Group and ConfigurationName.

Here is the code snippet written on Runnable class: GetAOTTablesList-

internal final class GetAOTTablesList
{
    /// <summary>
    /// Class entry point. The system will call this method when a designated menu 
    /// is selected or when execution starts and this class is set as the startup class.
    /// </summary>
    /// <param name = "_args">The specified arguments.</param>
    public static void main(Args _args)
    {
        AOTTablesList    tablesList;
        System.Collections.IEnumerator tableCollectionEnumerator;
     
        delete_from tablesList;

        ttsbegin;
 
        var query = Microsoft.Dynamics.AX.Metadata.NodeLib.Specialized.TableQuery::Construct();

        query.AllowTemporary = false;
        query.AllowSystem    = true;

        tableCollectionEnumerator = query.GetEnumerator();
                            
        while (tableCollectionEnumerator.MoveNext())
        {
            GetAOTTablesList::createTableRefRecord(tableCollectionEnumerator.Current as Microsoft.Dynamics.AX.Metadata.NodeLib.Node);
        }

        ttscommit;
    }

    internal static void createTableRefRecord(Microsoft.Dynamics.AX.Metadata.NodeLib.Node _node)
    {
        AOTTablesList    tablesList;
        SysDictTable            dictTable           = new SysDictTable(tableName2Id(_node.Name));
        tableId                 tableId             = dictTable.id();
        
        if (dictTable && dictTable.enabled())
        {
            // don't include views, temp tables, in memory tables, dixf staging tables, transaction, dataentity
            if ( DictTable.isView() || dictTable.tableType() != TableType::Regular || dictTable.tableGroup() == TableGroup::Staging
                || dictTable.tableGroup() == TableGroup::Transaction || dictTable.isDataEntity())
            {
                return;
            }

            tablesList.TableIdValue       = tableId;
            tablesList.TableObjectName    = dictTable.name();
            tablesList.TableLabel         = dictTable.label();
            tablesList.TableGroup         = dictTable.tableGroup();
            tablesList.ConfigName         = configurationkeyId2pName(dictTable.configurationKeyId());

            tablesList.insert();
        }
    }

}

Refer below the Table structure  & Fields:


At the end, if you want to execute the runnable job, create an Action menu item and add it to your custom module or any existing module.

After adding the menu item button, click on it.

Job will then be executed and you will be able to see records getting created in the table.

Here is the output of job execution.


Happy Daxing.. !!


Wednesday, March 15, 2023

Installation & Configuration of RSAT tool in Tier 1 Environment

Hello DaxPeople,

Today we are going to have a walkthrough on how to install and configure RSAT (Regression suite automation tool ) in Tier 1 environment.

Installation:

  1.  Navigate to the below URL to download RSAT .msi file https://www.microsoft.com/download/details.aspx?id=57357                                                           
  2.   Post download, run the file and click on install.                                                                                               
  3.  Part of installation it may ask to download and install Selenium and chrome driver. Click on Yes to install them.                                                                                                        
Configuration: 
  1. Navigate to desktop and find RSAT tool shortcut with name : Regression Suite Automation Tool.                                                                                                                
  2.  Double click and navigate to settings tab(refer below image)                                            
As shown in below image: We have different sections and for each section we need to provide inputs and perform test connection.   
                                              

     Section 1: Azure Devops:
             
            1. Azure devops url : https://<YourDevopsOrg>.visualstudio.com

            2. Access Token : It is generated by system admin who has full access to Azure devops. To generate a new access token, need to navigate to portal.azure.com --> Settings --> Access token.

            3. Project name : It is a lookup and by default the project name is visible when you connect to azure devops.

            4. Test plan : It is also a lookup and comes from the project name.

      Once above details have been provided, test connection button will ensure the input data correctness.
      When you click on that button, it will show below message.


       Section 2: Finance and Operations Test Environment:
  1.       Hostname: <D365 F&O Url without https>.cloudax.dynamics.com                                    
  2.       SOAP Hostname: <D365 F&O Url>soap.cloudax.dynamics.com                                      
  3.     Admin username: Any user added in System administration --> Users (With System administrator role assigned)                                                                                                 
  4.      Thumbprint: To generate a thumbprint, as we are dealing with Tier1 environment,        click on new button and it will automatically generate a thumbprint and the same will be added to trusted root certificates nodes in registry.

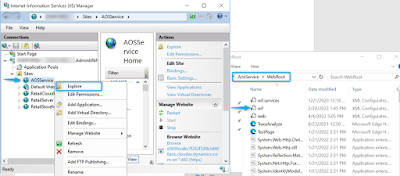
     Note: Copy the thumbprint number, it is required to change the config file(wif) of AOS service available under IIS manager portal. 

      To add thumbprint number to AOS service follow below steps.
  •     Navigate to Internet information services (IIS) manager and right click on AOSService (refer below image).

  •      Update wif.config file by adding another authority name (as shown below): 
                                    
                    
          <authority name="CN=127.0.0.1">

            <keys>

              <add thumbprint="<Copy the same Thumbprint generated when clicked on New>" />

            </keys>

            <validIssuers>

              <add name="CN=127.0.0.1" />

            </validIssuers>

          </authority>

            5. Company name: Legal entity name available in D365 F&O instance.

      Once above details have been provided, Test connection button will ensure input data correctness. When you click on that button, it will show below message.                                                                  

         
Section 3: Run settings

  1.      Working directory: Just create a local folder where all the RSAT files will be placed. By default, these are placed under C:\Users\RSAT.                                                                                         
  2.      Default browser: Provide either Microsoft edge/ Google chrome as browser


That's it folks. RSAT tool is now installed and configured. 

     Happy Daxing.. !!


Wednesday, March 16, 2022

Job to get current Application version and Product Version in Dynamics 365 F&O via front end and X++ code

 Hi Team,

Welcome to the blog. Today I would like to share the code snippet through which we can get the current Application version and Product Version in Dynamics 365 Finance and operations.

Note: Also these details can be accessed from the AX web client ( frontend) by clicking on "About".


Application and Product version


*********************************************************************************

class TogetCurrentApplicationAndProductVersion

{

    /// <summary>

    /// Runs the class with the specified arguments.

    /// </summary>

    /// <param name = "_args">The specified arguments.</param>

    public static void main(Args _args)

    {

        str productversion, Applicationversion, productApplicationversion;


        Microsoft.Dynamics.BusinessPlatform.ProductInformation.Provider.ProductInfoProvider provider = Microsoft.Dynamics.BusinessPlatform.ProductInformation.Provider.ProductInfoProvider::get_Provider();

        productVersion = provider.get_ApplicationVersion();

        Applicationversion = provider.ApplicationBuildVersion;


        productApplicationversion =(strFmt("%1(%2)", productVersion, Applicationversion));


        Info(   productApplicationversion);

    }


}

********************************************************************************

Happy Daxing.. !!


Wednesday, August 19, 2020

Integrate external applications with D365 Finance & Operations


Hi DaxPeople,

Recently we were investigating, what are the ways to integrate (Communicate data to and fro) from OnPremise/external applications with Cloud-hosted environments.

And voila, we found the QuartzAX tool provided which does the job using Data entities.

The below image is copied from Microsoft Github for data visualization.


You can go through more in below specified URL’s on the installation and configuration setup.

QuartzAX tool à https://github.com/Microsoft/Recurring-Integrations-Scheduler/wiki

Recurring data job also to be configured to pick up the messages from RIS(Recurring Integration Scheduler) in D365 F&O and to know more about creating data jobs, go through a specified URL.

Recurring Integrations & Data jobs in D365 F&O à https://docs.microsoft.com/en-us/dynamics365/fin-ops-core/dev-itpro/data-entities/recurring-integrations


Happy Daxing..!!

Convert EnumName to Label in AX2012 / D365 Finance & Operations

 Hi DaxPeople,

Today we are going to look into the most common issue we face while using Enums and its conversions.

In this post, we are talking about the code which will convert an EnumName to Label.


//SysDictEnum is the class to access all the conversion functions related to Enum

SysDictEnum  dictEnum       = new SysDictEnum(enumNum(SalesStatus));

str enumName      = 'Backorder';

int enumValue;


//symbol2Value gives us the "Value" available for that EnumName- Backorder         

enumValue     = dictEnum.symbol2Value(enumName);

//value2Label will gives us the label available for that particular enum - In this case its Open Order

enumLabel     = dictEnum.value2Label(enumValue);


Info(strFmt('enum Value - %1, enum label - %2',enumValue, enumLabel));


Hope the above code helps for your Enum conversion.


Happy Daxing..!!


Monday, August 10, 2020

All about Azure Service Bus -- Azure Logic Apps -- Dynamics 365 F&O.

Hi DAX people.

Hope everyone is doing well out there..!!

Recently I started looking into Logic Apps integration with D365 F&O and faced few issues while achieving the goal. 

Hereby mentioning the same on what was the requirement and how I was able to overcome the issues.


Requirement: We need to update an entity(eg : SalesOrderHeaderV2Entity) available in D365 F&O using Logicapps and Service Bus Messaging Queue.

So the flow here is, from AX2012(send a message to) à Service bus queue(sends a message to)à Logic apps(uses D365 connector to update a record ) à D365 F&O(record will be updated).


Prerequisites :

  • D365 F&O and logic app application should be available on the same Tenant and subscription where the VM is deployed.
  • User must have permissions to create/ update the record in D365 F&O.
  • If the authentication method provided at Logic apps is Active directory OAuth, then in D365 F&O à under Active directory applications form, user must be registered with the same client Id which was provided at Logicapps.
  • Both Logic apps and The service bus must be integrated with the same Queue and subscription name.

Issues faced at logic Apps workflow designer while executing the flow :


There are few basic connectors already available In logic apps that can be used to perform CRUD operations.

You can find the available connectors here

https://docs.microsoft.com/en-us/connectors/dynamicsax/

  1. Authentication failed: This issue happens, when the user doesn’t have permissions to perform CRUD operations in D365 F&O.                          

Issue:

{
"status": 401,
"message": "{\r\n "Message": "Authentication failed.",\r\n "StackTrace": null,\r\n "ExceptionType": "System.InvalidOperationException"\r\n}\r\nclientRequestId: bcc52356-17ba-429c-9307-815a5aaa931c",
"source": "<<URL>>.ax.dynamics.com",
"errors": []
}

       Resolution:

  • Make sure that, the user has admin rights to perform the operation.
  • Check whether the record is available in D365 F&O à active directory applications (same client Id to be registered for both logic apps & D365)
  • Logic app in the Azure portal should be created with the same admin user.
  • Under the same Subscription and tenant id, both(logic app & D365 VM) should be available.
      ************************************************************

  1. ObjectID for Update Record operation through the logic app:  ObjectId is mandatory while using D365 F&O  “Update a record” connector.

When incorrect ObjectId is passed, will get the below issue. We have taken the data entity - > SalesOrderHeaderV2Entity  as an example below.

           Issue:   

           { "status": 400,

"message": "Only 1 of 2 keys provided for lookup, provide keys for dataAreaId,SalesOrderNumber for SalesOrderHeaderV2.\r\nclientRequestId: 44ede2ab-85b5-4853-832e-6218f77c2c53",

"source": ""<<URL>>.azurewebsites.net"

}

Resolution:

ObjectId is the combination of Legal entity( to which we need to search and update record) + Entity key (defined at SalesOrderHeaderV2Entity level).

Note: If there are multiple fields defined in Entitykey, then all the fields value to be specified in sequence order along with DataAreaId. 

************************************************************

  1. No resources were found when selecting for update:  When trying to execute logic app designer, it is unable to find the data in the provided D365 F&O instance.

 Issue :

{

  "status": 400,

  "message": "An error has occurred.  No resources were found when selecting for update.\r\nclientRequestId: c1c6e39f-897d-4ef0-a2ff-5046a23b23b3",

  "error": {

    "message": "An error has occurred.  No resources were found when selecting for update."

  },

  "source": "<URL>.cloudax.dynamics.com",

  "errors": []

}

 Resolution:  After providing all the valid inputs still, the values are not being fetched.

Found out that, Odata data entities look for the data in default user company (Default company can be configured for a user in User optionsà preferences in D365 F&O).

After providing the setup, it was able to select the record and update it without any issues.


************************************************************

4. Sales entity update in case of Retail POS: After providing all the valid inputs for a record update, we came across an error “The sales order header entity does not support updates of sales orders which are associated with a retail channel”

             Issue :

             {

  "status": 400,

  "message": "An error has occurred.  Write validation failed for table row of type 'SalesOrderHeaderV2Entity'. Infolog: Warning: The sales order header entity does not support updates of sales orders which are associated with a retail channel..\r\nclientRequestId: 485f5dc5-feb2-442f-abe5-b1ccde5f540e",

  "error": {

    "message": "An error has occurred.  Write validation failed for table row of type 'SalesOrderHeaderV2Entity'. Infolog: Warning: The sales order header entity does not support updates of sales orders which are associated with a retail channel.."

  },

  "source": "d365-dev-04f1d90146db8afd7edevaos.cloudax.dynamics.com",

  "errors": []

}

Resolution :  

  • Strictly to be checked with Business - Either override the standard validation written on code (Salesheaderentityv2àvalidateWrite()) by using Chain of command  and use “Update a record” connector(OR)
  • Duplicate the entire salesheaderentityV2 and create an Odata action method to Post using HTTP Patch request.

 Note: We found out that there is a limitation for Odata action methods(SysODataActionAttribute). At the moment, it will work only for custom entities.

Even if you create an extension for standard data entity(eg: salesheaderentityV2) and try to create the Odata action method, then that method will not be exposed to external applications(like logic apps, powerapps).

More information related to Odata action methods can be found here àhttps://docs.microsoft.com/en-us/dynamics365/fin-ops-core/dev-itpro/data-entities/odata#adding-actions-on-odata-entities

************************************************************

 5. Fetching the message(reading the values) from Service Bus queue to Logic apps :

 Issue:  As part of testing, we initially provided constant values on the logic app workflow designer and the data is getting updated. 

But when we tried to fetch message from service bus, values are not being read by Logic apps.

    Resolution :  

  • Ensure that the message which is being sent to Service bus is in JSON format, so that we can avoid the conversion logic in Logic apps.

Providing sample JSON format below

{

  "CustomerAccount": "000001",

   "SalesOrderNumber": "000001",

  "legalEntityId": "DAT"

}

  • In logic apps, the message which was read from the Service bus will be in the “Base64” format. We need to explicitly convert the Base64 to a logic apps understandable language. Then only messages can be read and processed.  For that, we have expressions available in logic apps designer to convert it to a string.
  • In the example provided above, we used base64ToString()
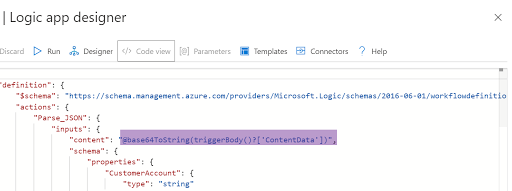
More details related to conversion functions and when to use can be found here: https://docs.microsoft.com/en-us/azure/logic-apps/workflow-definition-language-functions-reference#conversion-functions


Other resources related to this topic:

                             In order to avoid dependency on the tool, Microsoft already incorporated this in Azure portal and it is in the preview phase. ( reference: https://azure.microsoft.com/en-in/updates/sesrvice-bus-explorer/)


Hope the above information helps when you start working on topics related to - Azure Logic Apps, Azure Service Bus, and D365 F&O.


Important Note : 

Moreover, if you want the service bus messages to be read and processed automatically, we can use the Trigger: When a message is received in a Topic Subscription(auto - complete).

The only thing to make sure is that Service bus subscription to be created without enabling sessions


Happy daxing.. !!


Monday, June 1, 2020

Set Default Model in Visual Studio while creating new projects in D365 F&O

Hi DaxTeam,

Welcome to the blog. Here is a quick tip to set the default model in Visual Studio in D365 F&O.

Problem Statement: 
We will be working on a model to customize the objects and every time for a new Change request/ Bug as an initial step we create a Visual Studio project.
As per the setup provided by standard Microsoft, it will always create the project in "Fleet Management" and we need to change every time to our respective model. Below you can find the steps.

Resolution:  
To set the default model for newly created Visual studio projects, 

1. Navigate to the below path 
        C:\Users\<Dev VM login User ID>\Documents\Visual Studio 2015\Settings

and search for the XML file -- DynamicsDevConfig

Dev config XML file

2. Edit the XML file in Notepad and search for the keyword - "DefaultModelForNewProjects"
and add your required model name in the XML tag and save the file.

 
set default model

3. Now close and reopen the visual studio and create a new project. It will by default select the model which was mentioned in the above config file.

Note: We can also set the default web browser, default company to open the F&O client in the above-mentioned config file.
 
I hope it saves some time for you and it really did for ME .. !! 

Happy Daxing...!!


Tuesday, April 14, 2020

AXDB Database Take and restore SQLSnapshot in D365 Finance and Operations

Hi DaxPeople,

Welcome back to the blog. If you need to take SQL Snapshot of Database and restore it to the previous snapshot then you came to the right place.

It is always recommended to take SQL snapshot before performing complex queries which in-turn updates multiple tables in database. Once the testing is done, you can always restore the database with earlier snapshot.

Take SQL Database Snapshot in Microsoft Dynamics 365 F&O:

Pre-requisites to be completed before taking the database snapshot in SQL.


Step 1 - Close the Visual Studio Integrated Development Environment (if opened)

Step 2 - Stop the below mentioned services in services.msc window
    • World wide web publishing services
    • Management reporter services
    • Microsoft Dynamics 365 Unified operations : Batch Management services
    • Microsoft Dynamics 365 Unified operations: Data import export Management services.

Step 3 - Open Internet Information services Manager (IIS)  and stop the application.


Step 4 - Ask other users to disconnect the VM .

Take AXDb snapshot : 

You can execute below SQL query in Master DB , which will create Snapshot of existing version of database.

USE [master]; 
CREATE DATABASE  AXDb14042020_Demo ON  
( NAME = AXDb_latestPC
FILENAME = 'G:\MSSQL_DATA\AXDb14042020_Demo.ss' )  
AS SNAPSHOT OF AXDb ;  
GO 


Understanding the terms and keywords used in Query :

-- Master : is the Db on which below query to be executed

-- AXDb14042020_Demo : is the Snapshot name

-- AXDb_latestPC : is the logical name of the Database. It can be found under AXDb > Properties > Files > Logical name.


--'G:\MSSQL_DATA\AXDb14042020_Demo.ss'  : is the snapshot filepath where it gets stored.

-- AXDb : is the source database name.


After you execute the script, the database snapshot gets added to the SQL under Database Snapshots (refresh the node if you can't find it).


Taking the database version of snapshot is successful.


Restore snapshot to SQL Database in Microsoft Dynamics 365 F&O:

For restoring the snapshot also we need to follow the same pre-requisites mentioned above.

Once pre-requisites are completed, execute below query which will restore the snapshot.

USE [master];
GO
RESTORE DATABASE AXDb FROM DATABASE_SNAPSHOT ='AXDb14042020_Demo'


Understanding the terms and keywords used in Query :

-- AXDb : is the source database name to which Snapshot to be restored.

-- AXDb14042020_Demo : is the Snapshot name, which will be restored to source database.


Most of the time, users will face the issue while DB restore.

Database state cannot be changed while other users are using the database "XX".

To resolve this issue, execute below script which will remove active users from environment and then re-execute the restore snapshot script.

USE [master];

DECLARE @kill varchar(8000) = '';
SELECT @kill = @kill + 'kill ' + CONVERT(varchar(5), session_id) + ';'
FROM sys.dm_exec_sessions
WHERE database_id  = db_id('AXDb')

EXEC(@kill);

Understanding the terms and keywords used in Query :

-- AXDb : is the source database name from which users sessions will be closed.


Also, sometimes taking Database offline and bring online will solve the multiple users issue.


Happy Daxing ..!!


Monday, February 17, 2020

Using CrossCompany and ChangeCompany keywords in D365 Finance and Operations

Hello People,

Hope you are doing good. In today's post, will discuss about the requirement(a Script) which will update a record (if available ) in every legal entity by looping through them and increment the LineNum value with ONE.

This Script can also be used, when a data entity doesn't have Unique index/ Primary index on TestTable(standard table) and you want to customize it  by adding new LineNum field to make it as a Unique index.

Follow below sample code snippet on same.


class updateLineNumInTestTable
{       
    /// <summary>
    /// Runs the class with the specified arguments.
    /// </summary>
    /// <param name = "_args">The specified arguments.</param>
    public static void main(Args _args)
    {   
        TestTable        testTable;// Note: TestTable -Save Data Per Company property is set to  YES
        DataArea        dataArea; // Standard table which will store all legal entities

        while select id from dataArea
        {
            container        conCompanies    = str2con(dataArea.id);
            LineNumber   lineCount            = 1;
           
            ttsbegin;
            while select forupdate crosscompany : conCompanies
                LineNum, DataAreaId, RecId from testTable
                    where !testTable.LineNum
            {
                changecompany(con2Str(conCompanies))
                {
                    testTable.LineNum = lineCount;
                    testTable.doUpdate();
                    lineCount++;
                }
            }
            ttscommit;

        }
        info(strFmt('Process Completed'));
    }
}

Hope this post helps you to use the keywords CrossCompany and changeCompany. Happy Daxing.

Thursday, January 9, 2020

List.CS not found while debugging the code in D365 F&O

Hi Guys,

Welcome back, today we will discuss about one of the issue caused while debugging D365 F&O.

Problem Statement : While debugging standard classes in D365 F&O, some times we may get the issue like " .CS not found" and it says try one of the following options.


Resolution:
1) 
Try to check the parameter on Visual studio--> Dynamics 365 --> Options

Enable Just My Code is Enabled or not. If not enabled, please enable it.


2)  Open an existing Solution/Project in Visual Studio and Debug the code.

Even after following above options doesn't work, perform full Build along with DB synchronization.

That should solve the issue.

Thanks for visiting my blog and Happy Daxing. See you next time...!!

The supplied snapshotpoint is on an incorrect snapshot. Visual studio error .D365 Finance & Operations

Hi Guys,

Welcome back to my blog.. Its been long as I was busy with other things in my life.
As almost everyone is working on Dynamics 365 Finance & operation now, you will be seeing some posts on the issues and resolutions.

Today we will discuss on the issue, "The supplied snapshotpoint is on an incorrect snapshot." and it will cause visual studio crash.

In order to resolve this issue, we just need to change some of the Visual studio properties.

Problem Statement : Visual studio gets closed while writing a code in D365 F&O, refer screenshot below.

Supplied snapshotpoint
Resolution :  Open visual studio, Navigate to Dynamics 365--> Options

And disable the word wrap, as specified in below image.


Hurrah, now try to add/update the code. The issue gets resolved.
Enjoy and Happy Daxing.Will see you in other posts..!!


Monday, July 6, 2015

Microsoft Report Designer : Do you want to convert this report to RDLC 2008 format? Please click OK to proceed or Cancel to open it in the XML editor.

Hi All,

I have faced a strange issue while opening the Microsoft Standard report design.
Below are the error details and its resolution.

Issue :
 1)While editing the report design in visual studio I got the below message

2 ) I clicked on OK and got a error message displaying " one or more errors encountered while loading the designer.The errors are listed below."

The report definition has an invalid target namespace
"http://schemas.microsoft.com/sqlserver/reporting/2010/01/reportdefinition' which cannot be upgraded."


Resolution:

1) Click on Edit code.


2) Remove the Report section tags (both open and close).
 

 3) Edit the report namespace haeder.


4) Replace with below tag:

<Report xmlns:rd="http://schemas.microsoft.com/SQLServer/reporting/reportdesigner" xmlns="http://schemas.microsoft.com/sqlserver/reporting/2008/01/reportdefinition">

5) save the XML and report.

Now you should able to edit the report design.


Have a great day..:)

Happy Daxing..!!!