
Hello DaxPeople,
Today we are going to have a walkthrough on how to install and configure RSAT (Regression suite automation tool ) in Tier 1 environment.
Installation:
- Navigate to the below URL to download RSAT .msi file https://www.microsoft.com/download/details.aspx?id=57357
- Post download, run the file and click on install.
- Part of installation it may ask to download and install Selenium and chrome driver. Click on Yes to install them.
- Navigate to desktop and find RSAT tool shortcut with name : Regression Suite Automation Tool.
- Double click and navigate to settings tab(refer below image)

Section 1: Azure Devops:
1. Azure devops url : https://<YourDevopsOrg>.visualstudio.com
2. Access Token : It is generated by system admin who has full access to Azure devops. To generate a new access token, need to navigate to portal.azure.com --> Settings --> Access token.
3. Project name : It is a lookup and by default the project name is visible when you connect to azure devops.
4. Test plan : It is also a lookup and comes from the project name.
Once above details have been provided, test connection button will ensure the input data correctness.
When you click on that button, it will show below message.

Section 2: Finance and Operations Test Environment:
- Hostname: <D365 F&O Url without https>.cloudax.dynamics.com
- SOAP Hostname: <D365 F&O Url>soap.cloudax.dynamics.com
- Admin username: Any user added in System administration --> Users (With System administrator role assigned)
- Thumbprint: To generate a thumbprint, as we are dealing with Tier1 environment, click on new button and it will automatically generate a thumbprint and the same will be added to trusted root certificates nodes in registry.
Note: Copy the thumbprint number, it is required to change the config file(wif) of AOS service available under IIS manager portal.
To add thumbprint number to AOS service follow below steps.
- Navigate to Internet information services (IIS) manager and right click on AOSService (refer below image).
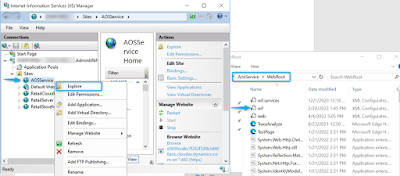
- Update wif.config file by adding another authority name (as shown below):

<authority
name="CN=127.0.0.1">
<keys>
<add thumbprint="<Copy
the same Thumbprint generated when clicked on New>" />
</keys>
<validIssuers>
<add name="CN=127.0.0.1"
/>
</validIssuers>
</authority>
5. Company name: Legal entity name available in D365 F&O instance.
Once above details have been provided, Test connection button will ensure input data correctness. When you click on that button, it will show below message. 
- Working directory: Just create a local folder where all the RSAT files will be placed. By default, these are placed under C:\Users\RSAT.
- Default browser: Provide either Microsoft edge/ Google chrome as browser
Happy Daxing.. !!

No comments:
Post a Comment